Black & Decker D2030 Iron Repair
Big Disclaimer
Irons are a common cause of
household fires, especially if they are repaired incorrectly. I have no
idea whether or not the solution below increases the risk of fire from
this model of iron. These irons are designed by the manufacturer to be
non-serviceable. Also, I have never been to Black and Decker Iron Repair
School. Therefore, the information that follows is intended only to be
interesting reading that also happens to be really good at putting
people to sleep. Should you choose to repair your iron in a similar
fashion, I cannot be responsible for any issues that arise as a result
of the repairs described below.
Reproducing the Problem
Before I started, I plugged in the iron in to see if I could reproduce
the behavior. Sure enough, within a few seconds of plugging in the iron,
it shut off. It seemed that moving the base of the cord (where it
entered body of the iron) to the left or top would cause the iron to
come on, and moving the cord to the right or down would cause it to go
off. It seemed like a cord problem, so I took a quick look at the cord. I
saw what looked like one small crimp near the plug end of the cord, but
wiggling this around didn’t seem to matter. Only wiggling the cord near
the base would make it shut off.
Nothing else on the cord looked suspect, so the problem seemed to be
within the body of the iron. Trying to save myself some time, I did some
quick searching on the internet, and came across this post describing
a similar problem. In that post, replacing the power cord resolved the
issue, so at this point I was hoping for the same.
Tools
After reading that post, I learned that the only way to get into the
iron was with a security screwdriver bit. Specifically, the bit needed
is called a “spanner” bit. A few minutes more of research turned up the Klein 32510 Magnetic Screwdriver with 32-Piece Tamperproof Bit Set,
which was rated pretty highly, and had four different sizes of spanner
bits. Surely that would give me what I needed. I didn’t already have a
screwdriver handle that worked with interchangeable bits, but the bits
are also available
by themselves.

Need to take apart things you aren’t supposed to take apart? Then the Klein 32510 is the screwdriver for you!
In addition to the screwdriver, I decided to buy the Donegan DA-5 OptiVisor Headband Magnifier. There were several reasons for this…
- My eyesight keeps getting worse as I
get older keep staring at computer screens all day long.
- I work on quite a few projects that require looking at small objects.
- The documentation says that it “increases your efficiency”.
- The documentation implies that I will look as cool as the guy on the cover when I am wearing the device.
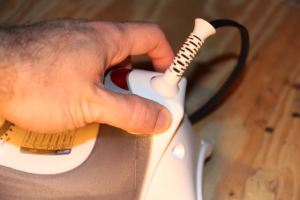
Removing the Back Panel
Optivisor or no, the first step in repairing the iron (after
draining it of water) was to remove the translucent back plate. I
thought about its purpose for a moment, and concluded that it was to
allow the manufacturer to put different accent colors on the iron. I
have never seen one that is any color other than gray, however. Now that
that important bit of thinking was out the way, I first took out the
largest of the spanner bits from its hole in the tray, and attached it
to the screwdriver.

The spanner bits are in the 3rd column from the right.

The largest spanner bit on the right is the one that is required for this iron.
Then I unscrewed both security screws from the translucent cover.

This translucent cover seems to be mostly decorative in nature.
Once that was done, I had to pop off the edges using a thin flat blade screwdriver.

Use a small screwdriver to pry off the translucent cover.
After the decorative cover was off, I needed to remove the inner
cover. Squeezing the handle with several of my fingers while pushing
toward the base of the iron (to the right in the picture below) with my
thumb and index finger seemed to do the trick.

Removing the inner cover.

Inner cover separated.
Removing the Cord
Now that the back panel was removed, I needed to remove the cord
itself. There are several wires in here, but they aren’t too bad if you
remember to label them as you go.

Inner cover completely removed
The first step in removing the cord is to get the wire nuts (the
little white plastic covers) off of the wires. The only two needed to be
removed were the ones that have the thick black wires of the power cord
in them. To get them off, I used some needle-nosed pliers to crush the
wire nut along its long side. This opened up the small piece of metal
inside that was crimping the wires together, allowing the wire nut to be
removed.

Use pliers to smash the wire nuts along their long axis in order to get them off of the wires they are holding in place.
The purpose of these wire nuts is to both hold several wires together
and keep them from touching other wires. Thinking it would generally be
a good idea to make the same wires go back in the same wire nuts at the
end of the day, I decided to put labels around all of the non-power
cord wires that were in each nut. Using a unique and strange convention,
I labeled the one on the right “R”, and the one on the left “L”.

Labeling
the wires is a good idea, so that you don’t have to remember them
later. Another way to do it is to look at photographs in blog posts.

“R” is for “right”, and “L” is for “left”.
Now that everything was labeled, I removed the small white piece of
plastic that was holding the power cord in place. A small
Phillips screwdriver did the trick.

Remove the plastic clamp holding the cord in place.
Now that the cord was free, I pulled it out of the big plastic ring through which it was threaded.

Pull the power cord free of the iron body
Fixing the Cord
Upon untying the cord and inspecting it, I found my problem. There
was an bad crimp in the cord just a few centimeters away from the place
where the knot was tied.

A bad crimp near the end of the cord
I cut the cord just on the far side of the crimp, and carefully split
and stripped the short wire (the bad one with the crimp still in it) on
the other side of the crimped spot to see if the wire was broken
inside. As I had expected, it was indeed broken. This would have
explained why the iron would come on and go off when you wiggled the
cord into different positions. Some positions would cause the broken
wire to touch itself, reestablishing the connection, and other positions
would separate it, breaking the connection.

The crimp after cutting the cord.
Since not much of the cord had to be cut off, I could thankfully just
strip and reuse the same cord. If the problem had occurred in the
middle of it, I would have been hesitant to cut out the bad part and
splice back the two good parts of the cord. The main reasons being that
pigtail splices look ugly on consumer electronic devices, and inline
splices would be two weak to stand up to any kind of further
cord-pulling from the iron-person.
Instead of splicing, in that case, I would have tried to find a
really long replacement cord either scavenged from other junk in my
garage, or purchased online. One
really important thing to note in that situation is that I would
have
to have found or purchased a wire with a gauge number equal to or lower
than the one printed in writing on the side of the existing power cord
(16-gauge or 16AWG on my iron). The reason for that is that
lower-numbers on the wire gauges mean that they are thicker wires, and
can handle more current before becoming hot, melting, or otherwise
having generally bad things happen. Since I didn’t do any kind of
analysis on how much current the iron was moving through that wire,
there would have been no way for me to ensure that a thinner wire would
be safe.
But, I digress. The point is just to not use thin wires if you do it
yourself. Since I could still use the long part of my existing wire, and
didn’t need a replacement cord, I used I knife to cut the insulation
connecting the two wires down just a couple of centimeters from the end
of the cord.

Cut the center part of the cord to separate each individual wire.
Next, I used a pair of wire strippers to strip each of the two wires
in the cord. Good wire strippers will have clearly defined labels next
to each “hole” indicating the gauge of the wire you need to strip. My
wire strippers are not good, and I have no idea what the markings on
them mean. I paid exactly $0.99 for them at one of those fly-by-night
stores that appear in the mall around Christmas time.

Use wire strippers to strip each wire. I have absolutely no idea what “4.0″ means here.

The final stripped wires.
Reattaching the Cord
Now that the “good” part of the cord had separated
and stripped wires on the end, I could reattach it to the body of the
iron. To do so, I tied a knot approximately the same distance from the
end of the cord that it was originally. It took a couple of attempts to
get it right, but eventually I got it so that the lengths of the
separated wires below the knot were of a length that would reach the
other wires.

Tie the knot back so that the wires from the cord can easily make contact with the other wires that were previously labeled.
Next, it was time to reattach the white plastic clamp that holds the
cord securely in the iron. I now had two sets of screws. The correct
ones to use were the Phillips ones that had flat business ends. The ones
with the security heads and the pointy ends were for the decorative
cover.

Two sets of screws exist that were previously taken off of the iron. Choose wisely.
I used my small Phillips screwdriver to screw the clamp back in
place. I had to take care to ensure that the cord was flat against the
clamp or else it may have caused another crimp.

Reattaching the clamp
Upon finishing the clamp installation, it was time to reconnect the
power cord wires to the other wires. I removed my “R” label, and twisted
those wires together with the right power cord wire. Similarly, I then
took the wire underneath the “L” label, and twisted it together with the
left power cord wire.

Twisting wires together

The final reconnected cord
The Moment of Truth – Testing the Iron
If there is one thing I have learned in working with technology,
whether it be computer software, computer hardware, consumer
electronics, or whatnot, is that you can save a
ton of work by
testing early and testing often. It saves work, and being able to fail
fast and get quick feedback gives you a much better chance to learn from
your mistakes and get better at whatever it is that you are trying to
do (I guess to be a better iron-repairer in this case).
This was about the earliest place I could test to see if what I did
made a difference. If this didn’t work now, I could check other things,
throw the iron away and buy a new one, ask for help from someone smarter
or more experienced than myself, etc.
If instead, I had tested only after putting the back plate on and
closing things up, a failure would have been much more frustrating. I
would have had to take the translucent decorative cover and inner cover
off again.
So, I plugged in the iron….

… and it came on. Even after I wiggled the cord around, it stayed on. It looked like the fix worked!

The iron seemed to stay on during testing while wiggling the cord.
Reattaching the Backplate
Now that I knew that I was making headway, and that reattaching the
back plate wasn’t a waste of time, I went about that task. Before doing
that, however, I needed to put the wire nuts back on the wires to ensure
that they held together and (more importantly) that they didn’t
accidentally touch other wires.
After looking at the original wire nuts, it became apparent that they
weren’t going to work for me any more. My manual twisting of the wires
together wasn’t nearly as elegant as the machines that had originally
created the iron and, as a result, had produced a twisted set of wires
that were now too thick to enter into the small opening inside the
original wire nuts.
Luckily, I had several spares lying around. If I hadn’t, I could have
picked some up at the local hardware store. I chose one big one for the
right set of wires (as they were a bit thicker), and a small one for
the left set of wires (as they were a bit thinner).

Store-bought wire nuts replaced the original white ones.
Another way to do this is with electrical tape. You can manually
twist the wires together really well, and then wrap all exposed wire
with electrical tape. The thing here again is that you have to be
really
careful not to let any wire be exposed. If you do, and it accidentally
touches the wrong wire, it can cause the iron to overheat or catch on
fire.
I pushed the wires I wanted together into the wire nuts and twisted
in a clockwise (from the top) fashion, just as if I were screwing in a
screw (righty-tighty, lefty-loosey, remember?). An important thing for
me to remember here was to not over-tighten the nuts. If I did, it would
have been possible to break off the ends of wires inside the nuts, and
then I would have had to re-strip and re-twist them into the wire nuts.

After installing the wire nuts.
To make sure that such a thing hadn’t happened, I again plugged in
the iron to ensure that it was still working. Everything still seemed
fine.
Next, I attached the inner cover. This was pretty easy, as it just
snaps back on. I did have to bend the wires and wire nuts “up”, as my
wire nuts were a little bigger than the originals and would not allow
the inner cover to snap on if they were in the “down” position.

Inner cover reinstalled
After that, I snapped the translucent decorative cover back on over the inner cover.

Reattach the translucent cover.
And then I used by fancy new screwdriver and security bit to attach
the decorative cover and inner cover in a more permanent fashion.

Replace the security screws.
And after testing once more – voilà! The iron was as good as new (with a slightly shorter cord).

The repaired iron
Thank Data from : racingcow.wordpress.com